Would You Like Fries With That?

You know when you order fast food and the attendant asks “would you like fries with that?” This also applies to the pool industry. Asking if your customer would like a refit kit or an over cover is just like that!

Add-on sales not only help you sell more, it can also save you and your customers time, giving better service and increase the life of their covers and make life easier.

Installation made easy

A refit kit is a great add-on sale because there’s a clear benefit for customers. It saves time and makes life easier (for everyone!), making the installation of a new pool cover to a roller a breeze. The kit has everything you or your customer needs. Keep a few in stock so you can make it even easier to sell or order at any time – Daisy Part Number #092.

What about the white over cover?

While we are talking about covers to existing rollers, how is the white over cover looking? Cover connection kits (and over covers) are supplied with every new roller, but it may be time for the over cover to be replaced.

  • Is there an over cover being used at all?
  • Does the customer know how to use it?
  • Has the white over cover simply come to the end of its life?

Here’s how you will know (if it’s come to the end of its life). Simply hold the over cover up to the sun. Can you see through the over cover where it gets folded? If you can, it means that the sun can get through and damage the pool cover. It’s time for a replacement! Order the right size by measuring the tube length of the roller.

The white over cover will help your customers get longer life from their pool cover. Want to hear more – feel free to ask us.

Buying and Selling a Daisy Pool Cover Should be Easy!

Quote & Close = Selling More!

When a customer asks “how much will a pool cover cost”, what they really mean is “can I talk to you about a pool cover for my pool?”

Rather than jump into attempting to quote and then trying to close the sale just on price, here are some suggestions:

1. ASK QUESTIONS

Ask them what they want from a pool cover? Is it to save water (evaporation control), keep their pool clean or to warm the water? By asking these questions, you’re establishing yourself as a Daisy Expert. As soon as they reply, you’re engaging them in a dialogue and starting to build a trusted relationship.

2. BE THE EXPERT

Start providing some advice – use all the tools we have on the Daisy website in our FAQs and more! If you need any training, just let us know – we’re here to help.

3. START THE QUOTE

Pricing up a quote is as simple as multiplying the square meters of the pool by the pool cover m2 price.

Daisy has made quoting pool covers easy. Every pool cover has a square meter price.

a). Simply measure the length and width of the pool. Then multiply together to get the square meters (length x width = m2)

Example:

8.2m long pool by 3.9m wide. The cover they want is the 525 Blue at $17.50 / m2.

(8.2 x 3.9 = 31.98m2 x $17.50 = $559.65)

b). Step area? If the pool has steps, here’s another opportunity to show your expertise. Here are some tips and FAQs on how to measure step areas.

Mobile? We all have a mobile device that can access the internet. Simply log into the Daisy website to get the latest retail pricing using the quote calculator.

Pop in the pool measurements, select what you want and the tool will calculate the recommended retail price immediately.

4. ASK FOR THE SALE

Don’t forget this! Once you have done all the hard work and designed the solution and price for the customer, ask for the sale!

Some simple questions:

  • What colour do you want? Is it the 525B or Titanium Blue you wanted?
  • Do you want to install this yourself or would you like me to do it?
  • Would you like me to place the order for the cover and roller now?

Oh and add on if you can – what sort of décor is your backyard? Is it modern or contemporary? If modern, why not sell them a 316ST stainless steel roller or compact, why not a UBR which is a great dual purpose product!

The close: A customer is just as busy as you are. The more you can make it easy for them, the easier it will be to close the sale.

Remember, don’t let them walk out the door saying that they’ll get back to you. If they do, try and get their contact details and follow up!

If you need help with a tricky quote or would like further training on measure, install or sales contact your local Daisy Area Manager or email us.

WinterKleen Proving to be a Year Round Clean!

We may have to look at changing the name of the WinterKleen because a WinterKleen is loved by any pool owner that has a leaf or any other debris problem – year round!

EasyKleen!

Pool owners will love you forever – regardless of season – when you show them what the WinterKleen can do for them … all year round! It saves hours of time over any season by keeping their pool clean. Effortlessly!

Removing the WinterKleen even if it is full of leaves is a piece of cake compared to trying to spend so many laborious hours cleaning the pool.

SpringKleen!

Since we extended the colour range to Blue, Green or Black, we have seen a steady increase in sales to the point where we have had to increase our production and resources to accommodate. Now well into spring, we are prepared for the steady growth in orders that will continue year – round for this popular product.

PerfectKleen!

Before each WinterKleen is put into production we take extra special care and steps to make sure we get it right the first time.

A plan is drawn up on a special program to make sure we get the dimensions and shape right. We then email our retailers the plan with an authority to sign off (once again making sure that you and the pool owner agree with the size and shape before we make it). Once the plan has been signed off and returned, the Daisy sewing department springs into action to create their magic.

SqueakyKleen!

The Daisy sewing department does it all! They edge the covers, take care of wind skirting and make every WinterKleen to measure including any special modifications that we need to do for you. Believe me…they are kept very busy and they love it!

For a full product description, check out our product pages.


What Is Roller Burn?

Roller Burn is when the pool cover is stored on the roller without the over cover being used to protect the pool cover.

What happens is the sun passes down through the layers, increasing in heat from layer to layer…superheating the pool cover. The compounding heating effect always happens in the same place at the top of the pool cover roll (as the pool cover is always wound up the same way).

Identifying roller burn can be difficult in the early stages, however there are a few tell-tale signs you can look out for.

  1. Pool covers can shrink up to 1% of their length with how they are made however they simply can’t shrink in their width naturally. If the pool cover has shrunk in the width, it is typically the first sign of it being stored on the roller without the over cover in place. The pool cover will shrink at the corners first, then in the width as the Roller Burn becomes more visible.
  2. Roller burn lines are easily spotted as the Roller Burn has ‘shrunk’ the pool cover material in superheated lines across the pool cover – in line with the top revolutions of the roller. These lines are approximately every 600mm and they start from about the second layer of pool cover down from the top of the roll. Depending on how long the damage has been occurring and how long the pool cover is, it will go almost all the way to the other end.

The pool cover will still operate normally regardless of the lines and shrinkage; the only adverse effect will be in the life of the pool cover. Typically we find where the overheating of the roller burn has occurred, the life of the pool cover decreases.

What does pool cover roller burn look like?

Step Area Tips

Step areas are often tricky business when it comes to pool cover quoting. Let us help simplify the process and share some tips to make it easier for you to measure, quote and answer those difficult questions.

Some frequently asked questions:

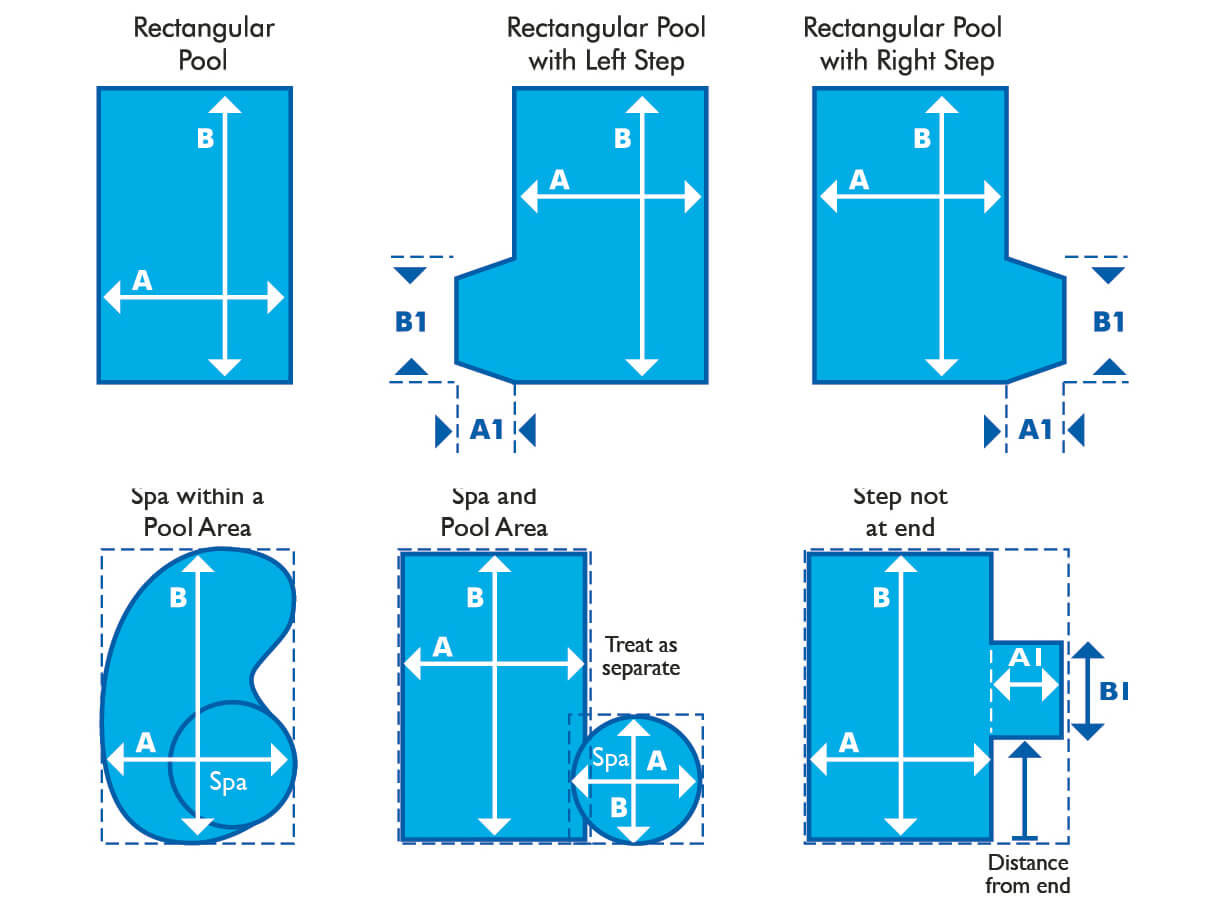
What do you mean ‘step area’?

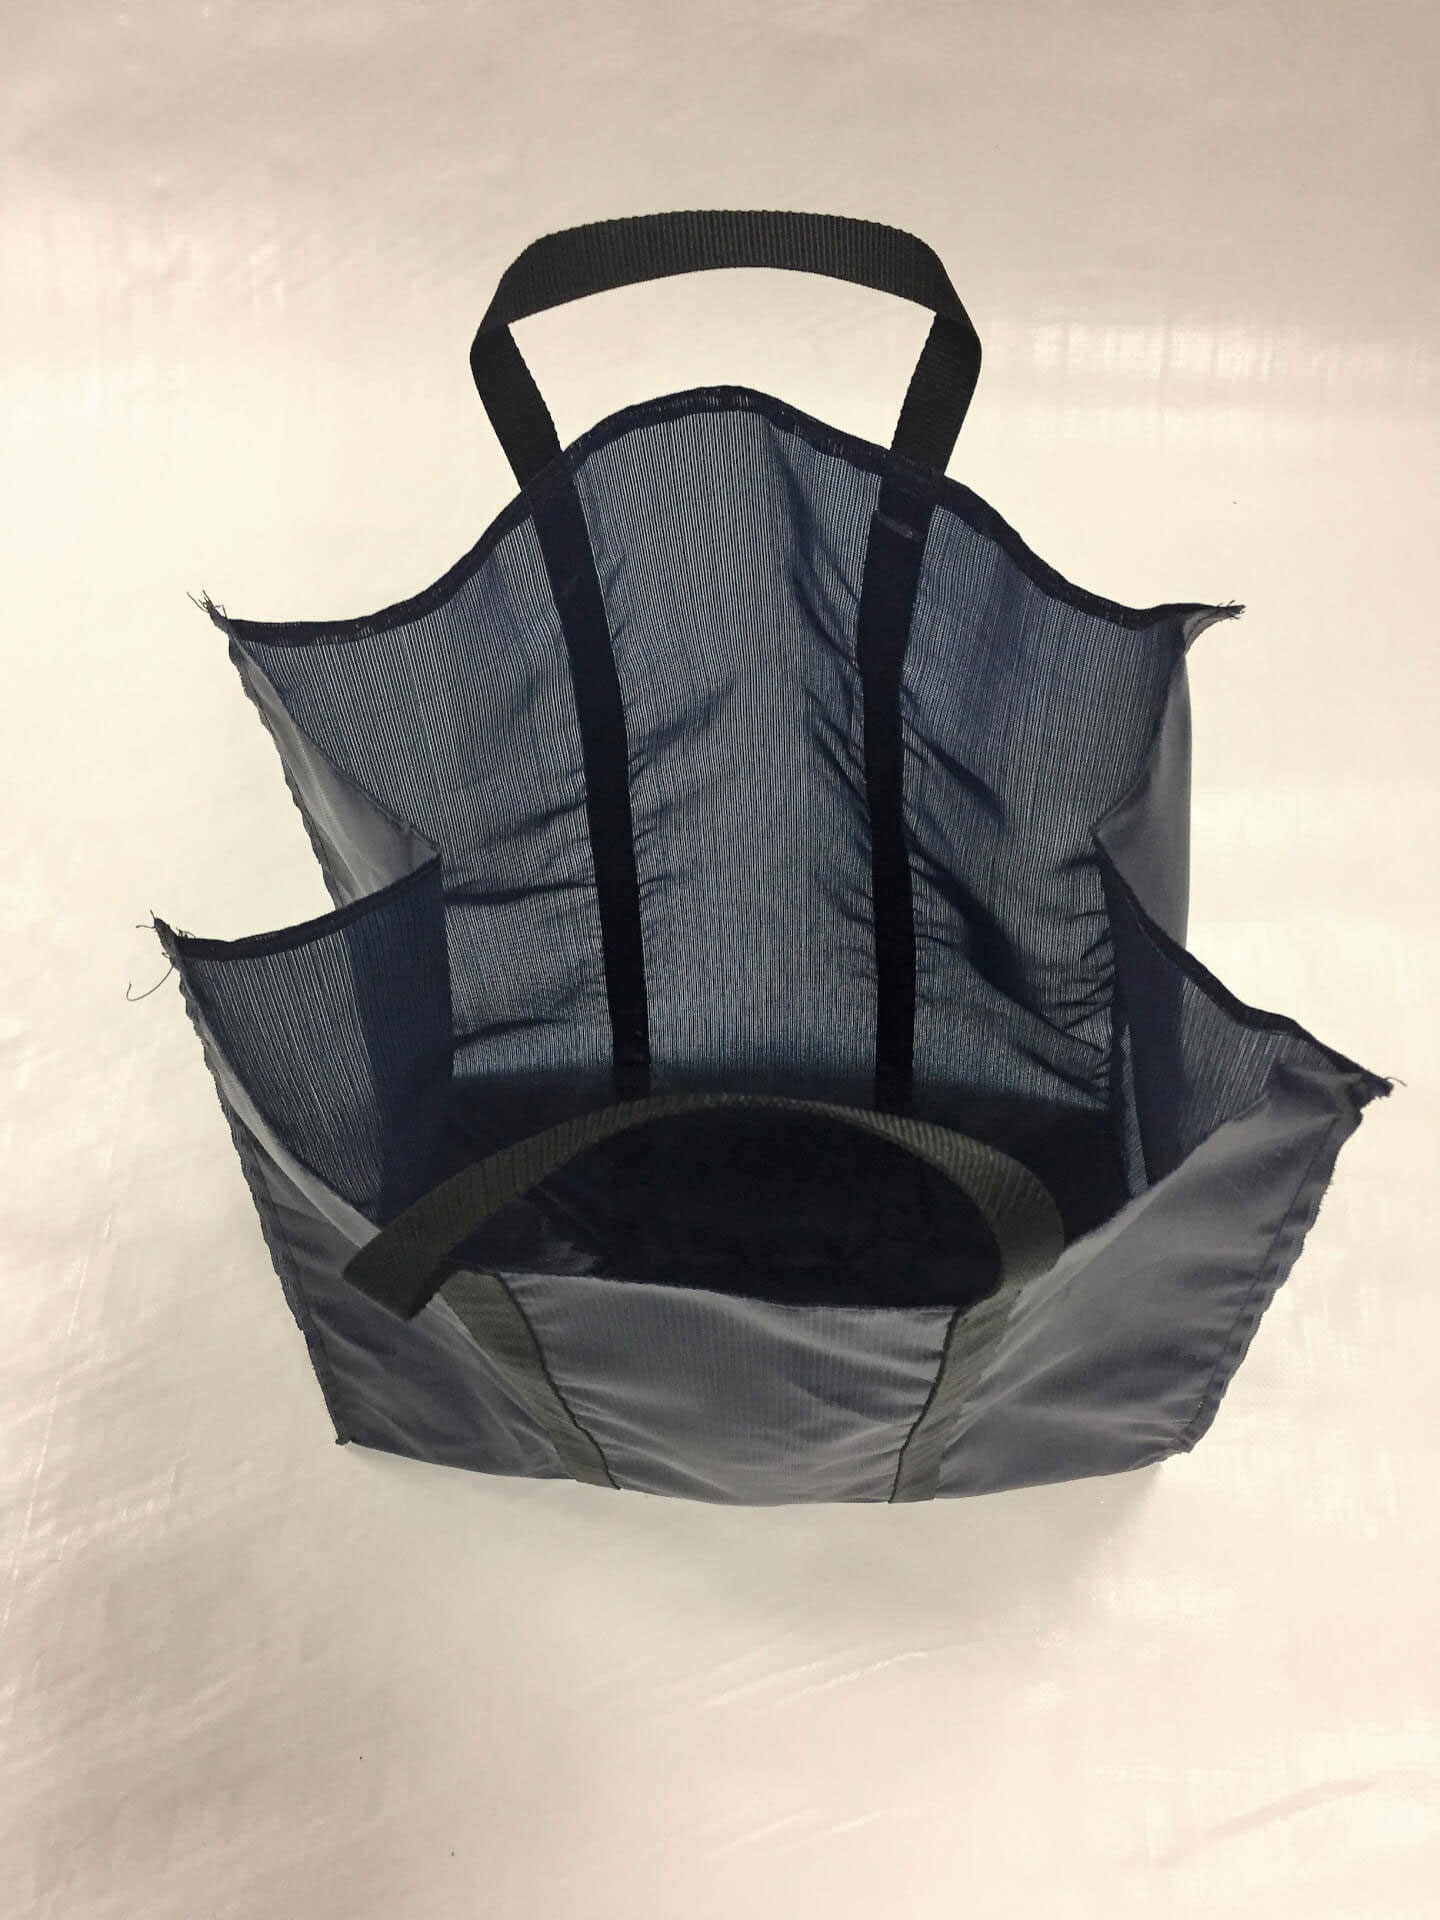
Every Daisy pool cover is custom made and welded in rectangles. If there is a portion of the pool that protrudes out from the main body eg the steps, we can weld on rectangles to cover these sections. The terminology ‘step area’ is the term used to describe the section of the pool cover that we weld to the side.


What if I have a swim out and not a step area?

It does not matter if the section protruding out is a swim area, spa or anything else. For all pool covers, this is still treated as a ‘step area’. We like to keep it simple!


What is the difference between a left or right step area?

Typically a step area is located near one of the corners. If you are sanding at the step area end and looking at the pool, the step area is usually either to your right or left. If it is by your right foot, we call this a Right Hand step area; on the left side, it is the Left Hand step area.


Does it matter where my step area is?

As long as we can locate where the ‘step area’ is, we can weld the additional rectangle to the main body of the pool cover.


What if I have more than one step area?

If you have more than one step area, say you have actual steps on the right as well as a protruding spa also on the right but at the other end of the pool, we would call then a Right Hand step area with a Right Hand Top step area.


How do I best measure up for a pool cover?

When you measure a step area, remember we make the pool cover in rectangles, so we need the length and width of the main body of the pool, then the length and width of the step area. We then weld the two rectangles together to have the one cover.

We will also need to know where the step area or areas are e.g. left or right and if at the end of a pool or somewhere else. If at the end of the pool, we’ll need to know how far from the end of the pool cover it is.


What if I have a different shaped pool?

Don’t worry if you have a unique pool – even if it has lots of curves! All we’ll need is the maximum length and width of the pool and we’ll supply a rectangular cover for on-site fitting.

To measure a step area, remember we are adding it to the main body of the pool cover. If the step area does come outside of the main body, simply measure how long and wide the step area is.

If the step area inverts inwards and it is not further out than the main body, then you don’t need any extra material to cover it. You’ll just have to trim away the excess.

If the pool is tricky, simply take a photo and sketch then email it through to [email protected]. We’re always there to help.


Why are the pool cover supplied from Daisy rectangular?

By supplying our pool covers trimmed and welded as rectangles, you’ll get the one pool cover almost ready to go. All you have to do is trim to exact requirements on site using the swimming pool as the real life template. This minimises the risk if you have a slight difference in your measurements and ensures less mistakes and wastage. Oh and we have Daisy scissors to help if you need a pair.


Do you cover a step area or not?

Generally the answer will be yes.

However, if the step area is particularly hard to get to every time you roll up the cover then we would advise not to cover it. Likewise, if there is a centre step area section, like a seat built into a wall, that is hard to get to, we would also advise to leave this step area uncovered to make using the pool cover easier.


How do I price up a step area?

Pricing a step area is the same as pricing the pool cover. Simply multiply the length by the width (to get the square meters), add the square meters of the step area to the square meters of the main pool size. Multiply the total square meters by the cover price and you’ve got it!

Saving costs: Don’t just take the maximum width of the pool including the step area as the width because once you have cut out the step area there will be a lot of wasted material that the customer has paid for.


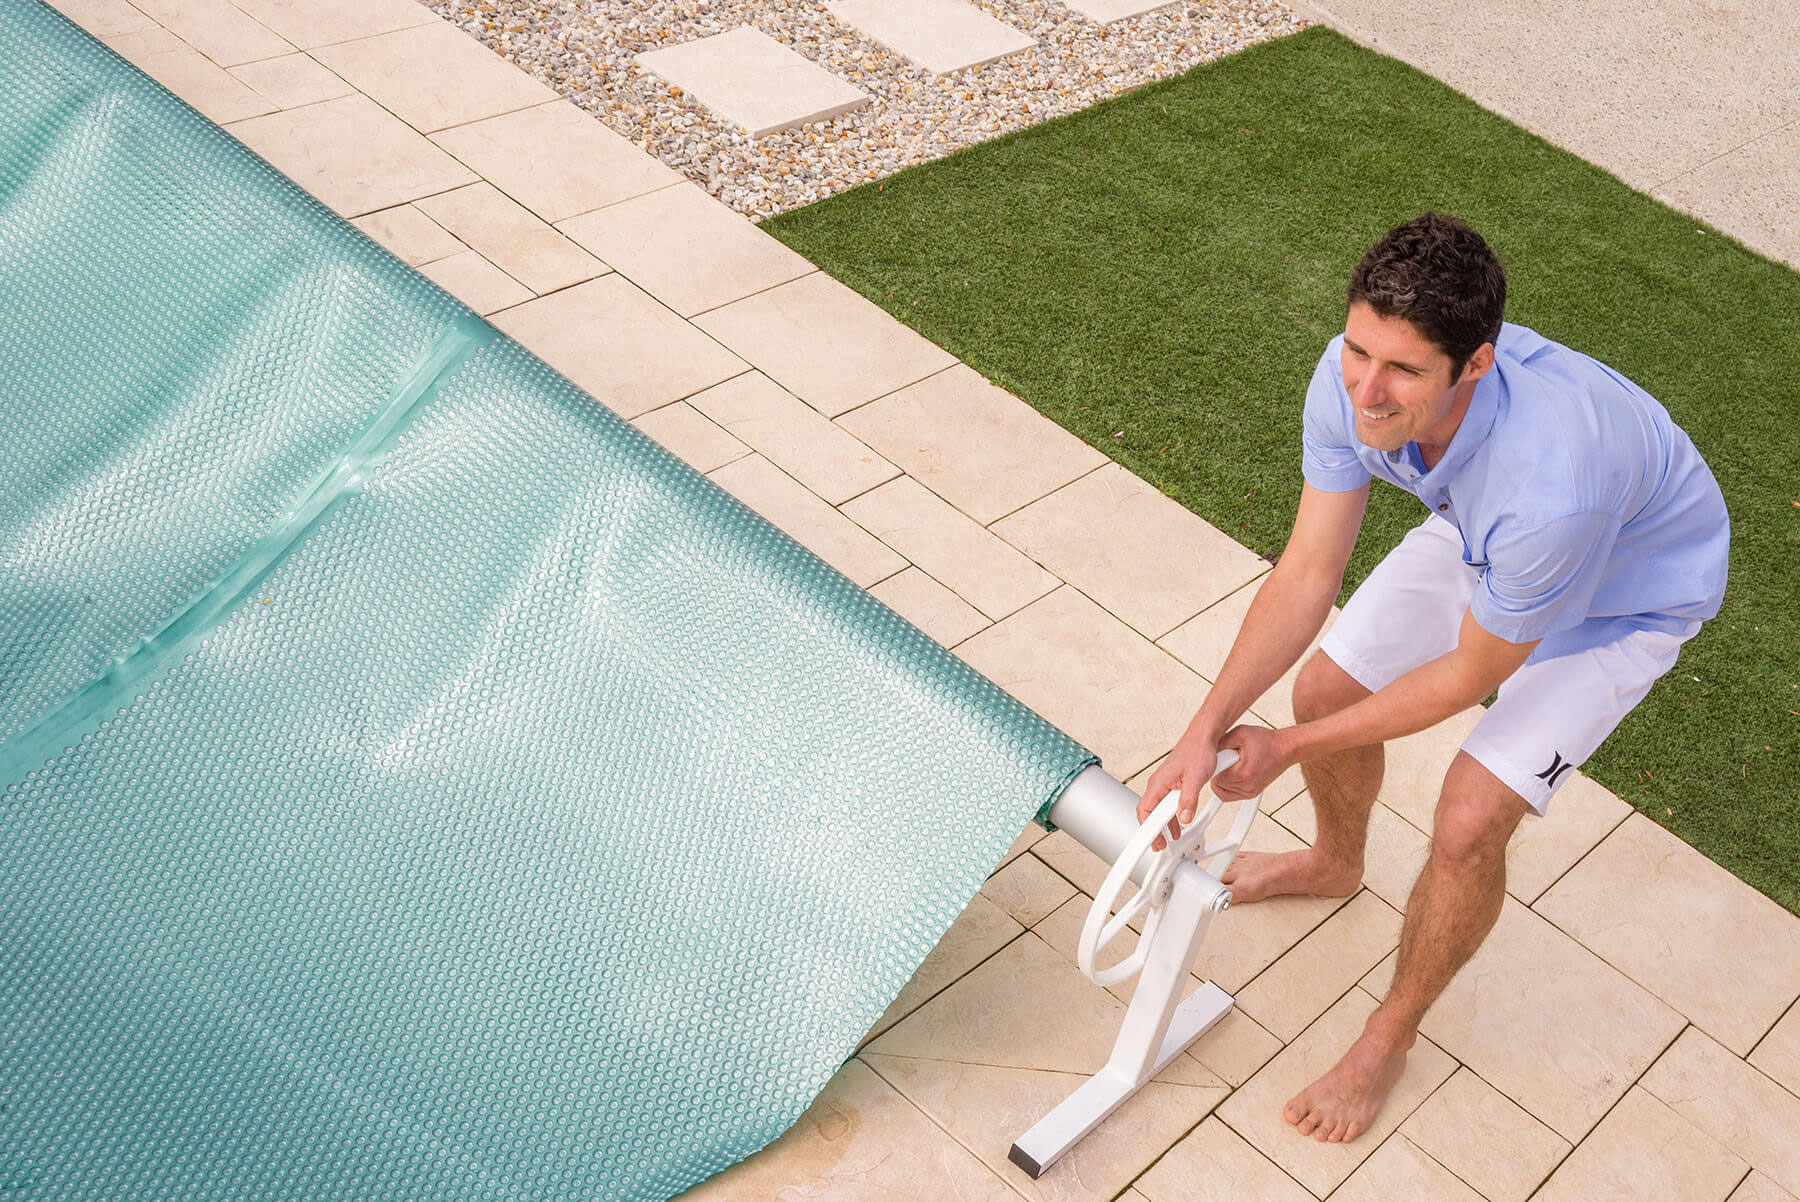
How do I roll up a pool cover with a step area?

Step areas are normally at the shallow end while rollers are normally located at the deep end away from the entry and exit to the pool.

To recover the pool cover, fold the step area over onto itself to create a clear line of sight to the roller, then roll up the pool cover.  Folding and leaving the step area folded when it is on the roller is fine.


What are the limitations to having a step area?

In rare cases, the step area is located at the roller end, which means that it will need to be folded at the beginning of the roll. This is not ideal as it will create an uneven roll and will always veer off one way.

The size of the step area can also be a challenge. It is hard to fold a step area that is over 2–3 meters long or over 1m wide.

We can weld a step area to any size, however folding larger step areas can be awkward.


Help is an email away.

If you need help in any way please don’t hesitate to contact us at [email protected].

Daisy Launches New Sand Filter Change Bags

Because you asked for them!

Listening to the industry has always been a hallmark of how we work at Daisy. It helps us drive innovation and deliver to you market leading and relevant products to help you sell more!


The problem: The sand filter blues…

We all know the problem the service tech’s have when they scoop or pump out the sand from the filter…what do they do with it after?

Some empty the sand on a tarp, the floor, or paving to let the water drain and then use buckets to move the sand to their vehicles to dispose of it.

Messy, painful and … there has to be a better way!


The solution: Daisy innovation

Over the last few months, we have been asked by a few pool shops to come up with an idea to address this issue. We used our strong and porous WinterKleen material as a base product to come up with the perfect free standing bag capable of holding the wet sand that comes out of the sand filter after a media change.

After a few trials and modifications we have done it! We created a bag that can take the weight of sand and be porous enough to allow the water to drain through.

The testing was a resounding success with orders already coming in strong.


The technology behind the quality – what you need to know.

The sand bags are made from the WinterKleen material so they let the water drain out, and are super strong.

Using Teflon sewing thread, the same that we use for the WinterKleen covers, we have a tried and tested material to ensure that you won’t have any issues on the quality of  the stitching.

For easy transport and added strength, we have designed in two 25mm polypropylene webbing handles that are sewn completely under the bag to support the weight.

The new Daisy sand bags are strong enough to hold 10-15 kgs – more weight than you can safely carry so don’t over fill the bags and hurt yourself!

We’ve also given a lot of thought on the design of the bag. The sturdy design is engineered to allow the bag to sit up on its own and maintain its shape for easy filling.  By folding over the sides (1/3 to ½ of the way down), it makes it even easier to stand up.


To order:

The sand bags are available now for only $18.50 + GST each. Freight for each order is $19.00.

Ask your Daisy Area Manager for more information:

Ready to Swim?

Winter has (finally!) broken and Spring has sprung!

After such a long winter, we may be now gazing towards the swimming pool wondering how long before we can jump in and enjoy a swim in the nice hot weather. There may even be a few of us wondering what chemical experiment is laying out there waiting for us!

One way to prepare for the swimming season is to call your local and trusted pool expert to get them to do a pre-season service to have your pool ready to swim in without any hassle.

If the buck stops at you … then let’s get out there this weekend and get it sorted!

If you have a Daisy WinterKleen pool cover you’re pretty well on your way to uncovering a pristine clean pool (that is a product plug for those that didn’t get it 😉 )

  1. Before we do anything to the pool water, let’s clean up the back yard around the pool. Make sure the pool area is clear of all leaves dirt and debris.
  2. If you have a pool cover, remove, clean and store it correctly. Then scoop out all the floating material you can.
  3. Check the water level. Make sure the water level is correct – half way up the skimmer box is normal for most pools.

Tip#1: After a lot of rain regardless of the season the pool water chemistry will be diluted. Always check the chemical levels after big rainfalls.

  1. If you have a salt water pool, make sure your cell is clean.
  2. Turn on your pump and filter system, make sure no off-season damage has occurred. Look for visual signs of leakage and generally make sure your whole system works the way it normally does. Leave it running for 8–10 hours.
  3. Now is the time to get out the cleaner and get to work.
  4. Check the chemical levels – it’s usually easier, cheaper and safer to take a water sample to your local pool shop for an expert to water test it. They give great advice on how to properly balance your water chemistry to get it out of the ‘winter blues’ into the ‘hello summer’ mode!

Tip#2: Make sure you take the water sample from elbow depth down. It is important that the chemistry of pool water is correctly measured at around 400mm below the surface of the water. Taking samples from the top of the pool will give incorrect readings that may well result in incorrect advice.

  1. Finally make sure your pool is safe, that the fence is secure, the gate is self-closing, there are no climbable objects outside the fence, any handrails into the pool are secure, and have a first aid kit handy and resuscitation board visible.

Remember if you need a hand, your local pool expert is there to help. They have the experience to check your pool and equipment to make sure it is fit to swim in. You may even find it cheaper and easier to get the experts in to check it all for you.

Happy Swimming!

If you need any assistance with your pool, check in with one of our Daisy Experts for advice.

Roller Tips

Daisy rollers are the best thing since pool covers! In fact, in most cases a pool cover can be put on or off in less than 30 seconds. But if it’s not installed or used correctly, it can be difficult. Are you doing it right?

Rollers are designed to make pool owners’ lives easier in deploying and rolling in a pool cover. Except if you are doing it wrong!

Believe it or not we get calls, even complaints that the rollers are hard to use. There are a few points we want to share and some tips for you to pass on at installation to help our customers get it right.

Here are some tips you need to know:

  1. Always roll the pool cover OVER the roller tube…not under. Why we are asked? Well when you roll the pool cover UNDER the tube it makes it very hard to pull the pool cover on and off the pool. UNDER means you are ‘lifting’ the hand wheels to roll up the cover. It is a lot harder to ‘pull’ the hand wheels back to you when you are standing behind the roller to roll in the pool cover. Then there is the geometry, yes there’s geometry with pool covers! When you roll in the pool cover OVER the tube, it increases the recovery angle from where the pool cover exits the water to the top of the roller. Adversely if you roll in the cover under the roller, the angle is reduced dramatically meaning you need to increase the force to recover. When you try deploying the pool cover when rolled UNDER…it takes a lot more effort to pull the cover back onto the pool when it has been rolled UNDER compared to the ease of deploying when rolled correctly OVER the tube. This is because when the cover is rolled UNDER you are pulling the roller more towards you than unrolling the pool cover. So always roll the cover OVER the roller tube to make using your roller easier. In short, OVER IS BEST!
  1. Don’t cut the pool cover too big. The higher it is up the wall of the pool the harder it is for the cover to exit the pool area and if you have headers that extend out over the pool this just increases the force needed to remove a larger pool cover sheet out of a smaller opening.
  2. Create a line of sight. For kidney shape or step areas away from the roller…always fold in the section poking out from the roller to create a ‘line of sight’ back to the roller. This makes rolling up the pool cover a lot easier and avoids the pool cover being caught on headers or parts of the pool – see below.
    roller-tips-diagram
  3. Place the roller at the water edge. The closer to the water, the easier it is to use. If the roller is set up too far away from the pool it makes it harder to use because you are pulling the pool cover against the edge of the pool towards the roller. Rollers are easy to move.
  4. Keep the cords as long as possible. The roller cords should be left at full length to allow the cord to wrap around the roller tube, don’t adjust the cords as short as possible. When the cords are wrapped around the tube they align themselves to the pool cover making it easier to pick the cover up off the pool. The other reason is to take the weight off the feather plugs. By wrapping the cord around the roller tube when recovering it will stop any undue breakage or pulling out of the feather plug during operation.
  5. Don’t get fancy. To put the cover back on the pool, for most pools you really don’t need any other tools like a haul cord or any weird or wonderful techniques. Simply take hold of the pool cover with your hand.

Tip #1: Fold over the corner opposite to where you re pulling the cover to cause a bow effect. This is up to you as in most instances the other side will fold under the cover to cause a bow effect anyway!
roller-tips-2

  1. Always use the supplied over cover to avoid damaging the pool cover!

Tip #2: Install the pool cover bubble side down so the flat surface is to the top.

If you need any assistance with your pool, check in with one of our Daisy Experts for advice.


Ducks or No Ducks!

Cute or messy?

At certain times around Australia, we’ll see beautiful wild ducks flying over our properties. And some of these ducks even call our pools home!

Cute? Hmmm… anyone who has had the unfortunate experience of even a single pair of ducks moving in will tell you they make one heck of a mess!

Duck excrement will dramatically change your pool chemistry. If the ducks swim in your pool, you will notice fairly quickly just how dramatic the change can be. They also tend to make your pool surrounds very messy and unpleasant.

And once the ducks have found your pool, they will keep coming back…until you do something about it.

A pool cover will stop ducks!

It is that simple! Place a pool cover over your pool, whether it be a solar pool cover or a WinterKleen cover, and as long as the water is covered the ducks will stop visiting. They will fly to another home and leave you in peace…apart from the big mess they might have left you!

Check out our range of Daisy Pool Covers.

What Do I Do With My Pool Over Winter?

The age old question of what to do with my pool when it’s not being used. 

Well you have two main options

  1. Forget about it and let it turn into a frog pond until it warms up again or
  2. Keep it clean!

The most economical way to maintain your pool is by continuing to look after it. It will save you a lot of time, money and effort in the long run. Anything else is a false economy!

When summer returns, you’ll have to spend even more time and money to bring back the science experiment that was created in your pool by ignoring it over winter!

Some easy suggestions to help you through the winter months –

Firstly, keep safe.

  • Always add chemicals to water in a bucket and never add water to chemicals
  • Never mix different chemicals together
  • Always read chemical labels and follow their advice.

Cleaning your pool

  • Remove all floating debris by scooping and vacuuming
  • Clean your filtration equipment
  • Empty baskets, skimmer & pump lint pot
  • Clean your filter
    • Backwash the sand filter; or
    • Hose out the cartridge filter; or
    • Take apart the D/E filter and clean; and
    • Clean chlorinator cell if required.

Re-balancing chemicals. Adjust the alkalinity level to between 80-120ppm.

  • To increase the alkalinity, add sodium bicarbonate to the pool (never more than two kilos per day)
  • The re-balancing of alkalinity (to lower levels) will be addressed when re-balancing the pH levels.

Adjust pH to between 7.2-7.6

  • To reduce the pH Level, add pool acid (no more than 500mls at a time)
  • To increase the pH Level, add soda ash.

Super chlorinate your pool

  • Remove your pool cover and only replace after the chlorine has returned to normal range
  • Shock dose your pool with 500gms of granular chlorine for a 50,000 litre pool (or 10 litres of liquid chlorine).

Add algaecide

  • Add a long life algaecide, at the recommended dosage, to the specific volume of pool water.

Run your pool filtration equipment

  • Run for at least eight hours to thoroughly mix chemicals during the process of re-balancing
  • Adjust the filter timer to operate between 3-4 hours per day to maintain over the winter.

Use a pool cover!

  • If installing a pool cover over winter, wait until the chlorine level has reduced to between 2-3ppm.
  • Reduce the Chlorine Production Output (CPO on your chlorinator). The pool cover will maintain 90% of the chlorine (produced by your chlorinator) in the pool, as opposed to loosing 70% of chlorine in an uncovered pool. A pool cover is really worth it!
  • Check the chlorine level after one week. If the result is between 2- 3ppm, you will only need to check levels every two weeks thereafter.  If the level is higher, you will need to reduce the chlorine production (via CPO) and re-check levels one week later.
  • Check and adjust the pH level every two weeks.
  • The water level must sit half way up the skimmer box. Don’t forget that you will need to drain water out of your pool after rain.
  • Don’t ever completely drain your pool as hydrostatic pressure can cause serious damage – even to the extent of having pools ‘pop’ out of the ground!

Keep an eye on the pool every few weeks, remove any floating debris and even vacuum! With just a bit of time and a watchful eye over the winter months, you will save you a lot when the summer comes along! And it will be ready for you!

If you need any assistance with your pool, check in with one of our Daisy Experts for advice.